Changes for page NUSTATYMAI IR ADMINISTRAVIMAS
Summary
-
Page properties (1 modified, 0 added, 0 removed)
Details
- Page properties
-
- Content
-
... ... @@ -444,35 +444,13 @@ 444 444 445 445 Once the errors are corrected, the data will have to be uploaded for specified rows once again by entering information into a new / separate L11 table template. 446 446 447 +**//2. "Manual data exchange" //** 447 447 448 - **//2. "MergeLT groups" //- masscombining intogroups of alternative items(ALT).**449 +[[image:86_Actions.png]] 449 449 450 -[[image:20200917_2.png]] 451 451 452 -In the window there is a draft of the table for mass combining of the items into ALT groups. 453 453 454 -[[image:20200918.jpg]] 455 455 456 -* Main SKU code: SKU code of the main item in the group. 457 -* Parameters SKU code: SKU code of the item, which parameters will be assigned to the main SKU. 458 -* Old Main SKU code: if the existing group of items is changed, indicate the existing (old) code of the main SKU in the group. The Main SKU code field must contain the new main SKU code. 459 - 460 -If a new group is being combined, do not specify anything in this field. 461 - 462 -* Alt SKU code: SKU code of alternative item 463 - 464 -Note: If there is more than one ALT item code for the same main SKU code, they must be listed on separate rows, repeating the main SKU code on each row. 465 - 466 -The completed table needs to be imported into StockM. 467 - 468 - 469 -**//3. "Manual data exchange" //** 470 - 471 - 472 - 473 -[[image:20200917_3.png]] 474 - 475 - 476 476 It is possible to run repeated data exchange in StockM administration module, if the data were not updated in time or were updated unsuccessfully. 477 477 478 478 **IMPORTANT:** data files must be formed from the accounting program, before completing that function, and sent to FTP or other agreed place. ... ... @@ -485,11 +485,14 @@ 485 485 [[image:101_t.png]] 486 486 487 487 488 -**4//. „Change SKU code~://** 489 489 490 - [[image:20200917_4.png]]467 +**2//. „Change SKU code~://** 491 491 469 +[[image:85_Import.png]] 492 492 471 + 472 + 473 + 493 493 You can change the SKU code of item in the SKU administration module (Change SKU code), i.e. when the new code is entered in accounting system instead of previous code. 494 494 495 495 **IMPORTANT:** Changes must be done the same day in the accounting program and in StockM.
StockM administration module is only in English language. StockM administration module is created to change system settings, create new users and warehouses, analyze user actions, repeat data exchanges, upload data via files help.
Login
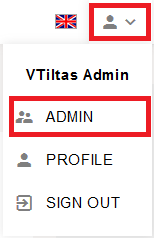
1. You can login into StockM administration module straight from StockM (only for users, who have the rights for it):
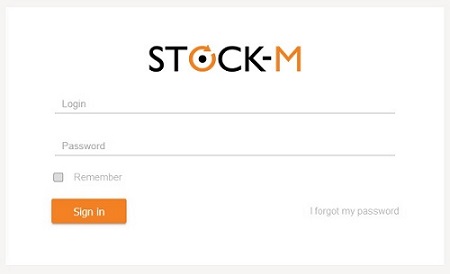
2. Address (if you write “/admin/index.html” near usual StockM address): http://xxxxxx.stockm.net/admin/index.html.
Login name and password are the same as login to StockM:
Log out
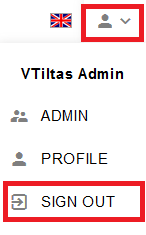
We recommend to log out in this way, from StockM window, when there work several users and they log in to the same computer with different login details.
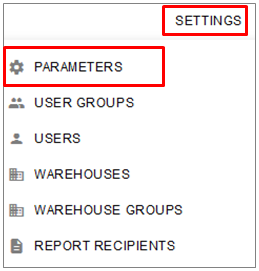
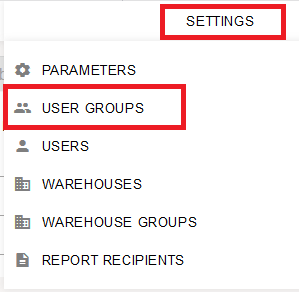
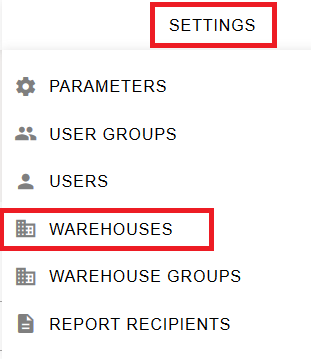
Settings
1. "Parameters":
1) Settings

- Default SKU graph (days) – number of days in item SKU graph, which show the information. This period is showed every time when you open an item graph.
- Default analytics graph length (weeks) – number of weeks in StockM reports: Inventory Dynamics, Buffers Dynamics, Level of Inventory (DTA). This period is showed in StockM reports.
- Manager ID for SKUs with missed manager – user, who is responsible for items, which are not assigned to anymone.
2) Labels – names of additional columns, editing. Fill in the names of all used columns (such names you will see in the StockM system):
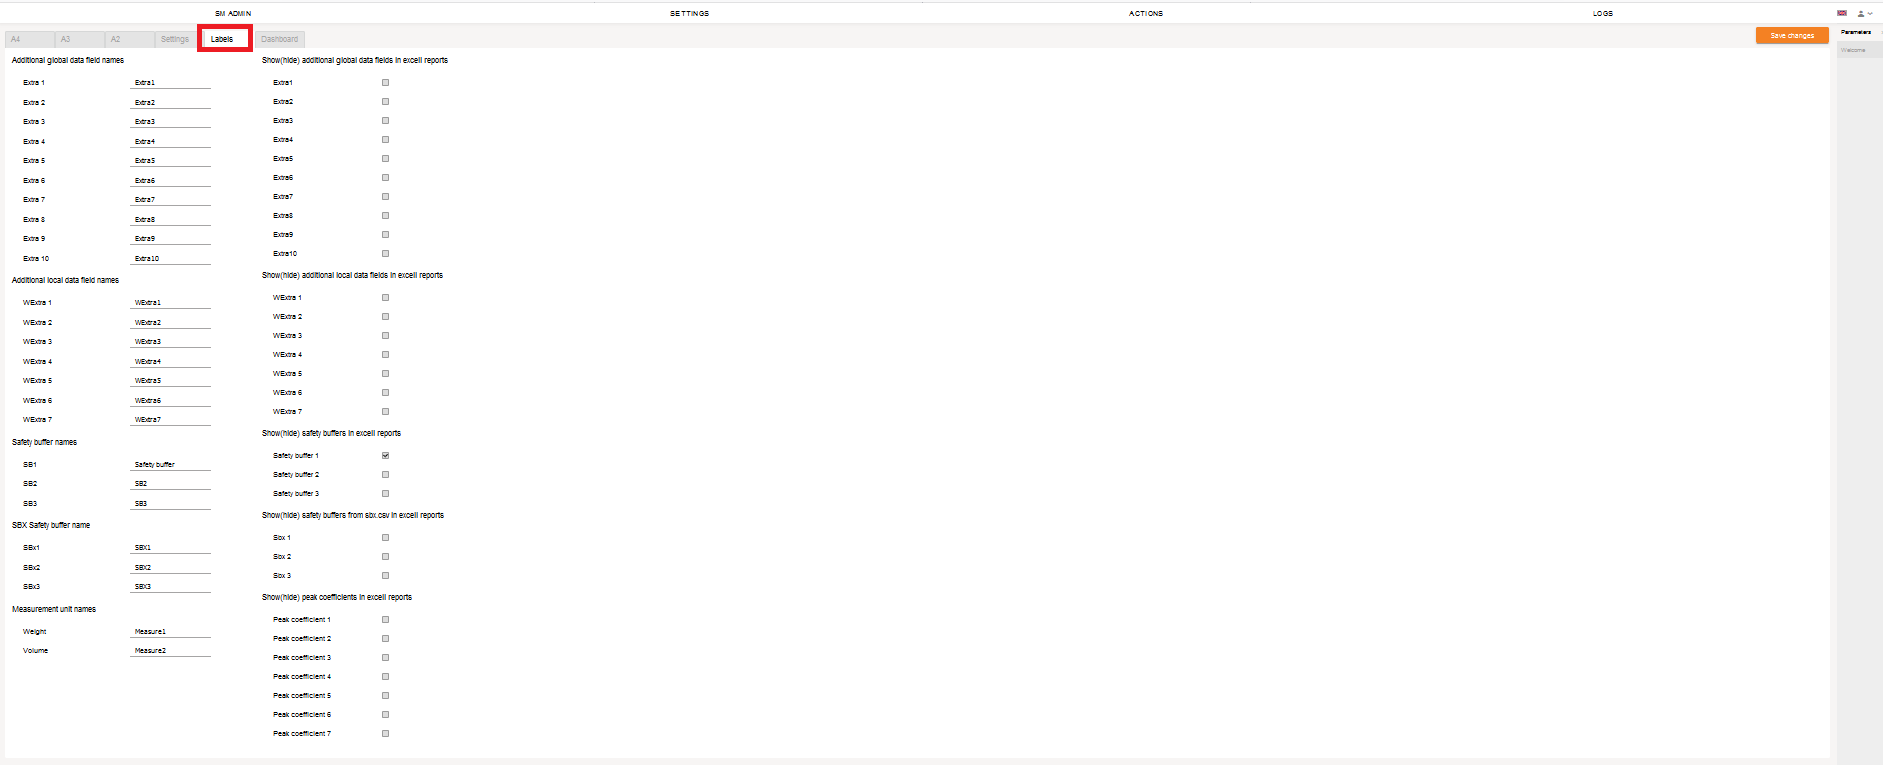
- Additional global data field names;
Extra 1-10 – additional columns via company. Format of the value is only text and it doesnt‘t matter if transferred information is in text or in numbers.
- Additional local data field names:
Wextra 1-7 - additional columns via warehouse. Format of the value is only text and it doesnt‘t matter if transferred information is in text or in numbers.
- Safety buffer names:
SB 2-4 – additional safety buffer columns.
- SBX Safety buffer name:
SBx 2-4 – safety buffer fields, which can be updated daily according to data, which are received via file sbx.csv.
- Measurement unit names:
Weight (Measure1)
Volume (Measure2)
- Show (hide) additional global data fields in excell reports:
Extra 1-10 – additional fields in reports. All these fields are in the reports, however they are hidden (you can open them if you need). If you put check marks on this setting, marked fields will be visible at the same time when you open it (will not be hidden).
- Show (hide) additional local data fields in excel reports:
Wextra 1-7 - additional fields in reports. . All these fields are in the reports, however they are hidden (you can open them if you need). If you put check marks on this setting, marked fields will be visible at the same time when you open it (will not be hidden).
- Show(hide) safety buffers in excell reports:
Safety buffer 1-3 – safety buffers in reports. When you put the check marks, the fields will be visible in the reports, when you open it (will not be hidden by default).
- Show(hide) safety buffers from sbx.csv in excell reports:
Sbx 1-3 safety buffers from sbx.csv in reports. When you put the check marks, the fields will be visible in the reports, when you open it (will not be hidden by default).
- Show(hide) peak coefficients in excell reports:
Peak coefficient 1-7 peak coefficient visibility in reports. When you put the check marks, the fields will be visible in the reports, when you open it (will not be hidden by default).
1) Dashboard – there are visible settings of parameters scales in the primary window of StockM („Today“):

-Overstock gauge size – there is a visible breakdownd by percentage of overstock scale in the primary StockM window („Today“). About parts which is agreed in the process of project. It is determined on a company scale.
-Lost sales gauge size – there is a visible breakdownd by percentage of lost sales scale in the primary StockM window („Today“). About parts which is agreed in the process of project. It is determined on a company scale.
-Turnover gauge size - there is a visible breakdownd by days of turnover scale in the primary StockM window („Today“). About parts which is agreed in the process of project. It is determined on a company scale.
2. User groups:
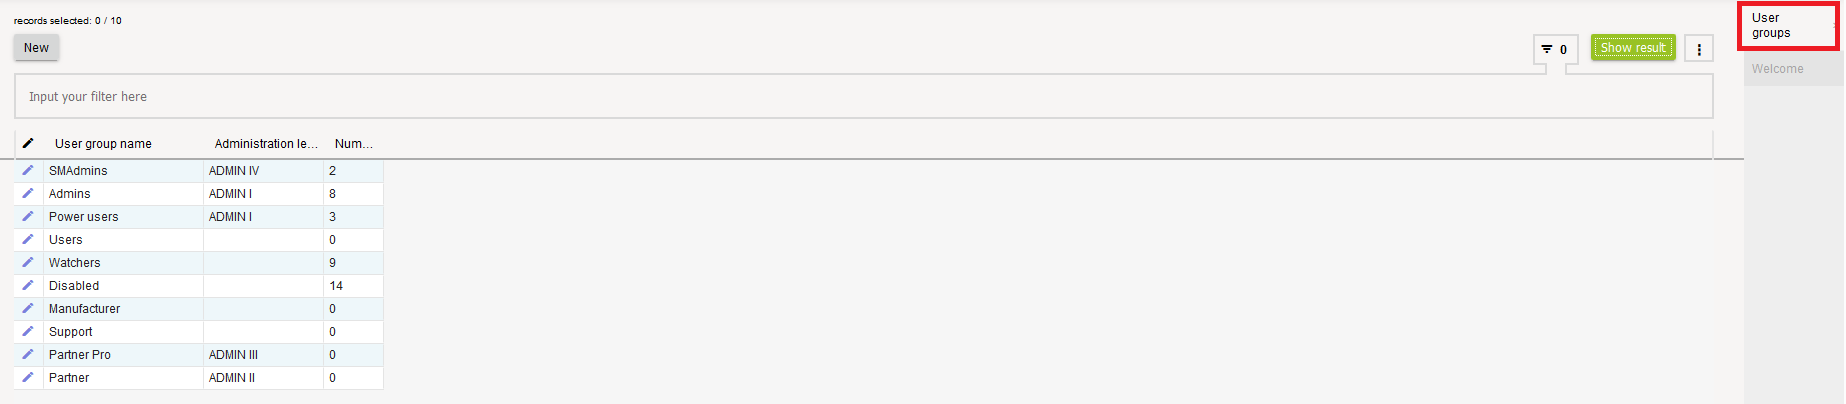
Users are divided into groups (the same rights are given to all users, which are in one group):
-Admins: assigned employees, which work with the StockM assortment management system, who can make all changes/corrections, create new users, assign and change the rights, warehouses for users, complete other settings (users, who have most rights)
-Disabled: not active users.
-Manufacturer: user/producer, who can see only his own goods.
-Power users: assigned employees, which work with the StockM assortment management system and can make all changes/corrections.
-Support or other: possible to create a group of users with separate rights. Click the button „New“, choose the name of user group and level of administration. Click the button „Save“, after entering all information.
-„Users“: assigned employees, which work with the StockM assortment management system, can make certain changes (users, who have less rights).
-Watchers: assigned employees, which can review/analyze/read an information, which is in StockM assortment management system, however can‘t make any changes (users, which have less rights – the right to „read“).
If you want to remove the group, click the button „Delete“ (Remove).
If you want to change/edit the rights of the user group, click ..... in the user group list and click „Save“ after changing the rights.
Rights for group of users:
General data:
-User group name
-Administration level
Users visibility on DashBoard:
-All users are visible (in system warnings, tasks and window “Today”), include all users, which are marked/ticked “show in dashboard”.
Buffer access:
-Edit buffer: after placing a check mark, user can edit the value of buffer in all windows, which have such possibility (it is possible to change buffer value, when you change buffer quantity, in the new order).
-Buffer increase menu (view – see that menu; no access – no permission to see the menu).
-Buffer decrease menu (view – see that menu; no access – no permission to see the menu).
-Buffer incomplete menu (view – see that menu; no access – no permission to see the menu).
-Buffer questionable menu (view – see that menu; no access – no permission to see the menu).
-Buffer safety menu (view – see that menu; no access – no permission to see the menu).
Order access
-Create regular order (user will be able to create a regular order after placing the check mark).
-Create special order (user will be able to create a special order after placing the check mark).
-Orders unlimited (user will be able to place orders, without limiting quantities of orders).
-Place special order (user will be able to send a special order after placing the check mark).
-Placed order menu (full access – get all rights to manage; view – only see this menu, information; no access – have no permission to see the menu).
-New order menu (full access – get all rights to manage; view – only see this menu, information; no access – have no permission to see the menu).
-Closed orders menu view – (view - see this menu, information; no access – have no permission to see the menu).
-PTO orders menu (full access – get all rights to manage; view – only see this menu, information; no access – have no permission to see the menu).
Assortment access:
-SKU data menu (full access – get all rights to manage; view – only see this menu, information; no access – have no permission to see the menu).
-Alt items (full access – get all rights to manage; view – only see this menu, information; no access – have no permission to see the menu).
-SKU by warehouse (WSKU) data (full access – get all rights to manage; view – only see this menu, information).
-Prices field visibility (after placing the check mark, user can see the prices).
-Inventory menu (full access – get all rights to manage; view – only see this menu, information).
Supplier access
-Supplier data menu (full access – get all rights to manage; view – only see this menu, information; no access – have no permission to see the menu).
-Supply schedule menu (full access – get all rights to manage; view – only see this menu, information; no access – have no permission to see the menu).
-SKU by warehouse by supplier (SWSKU) data (full access – get all rights to manage; view – only see this menu, information; no access – have no permission to see the menu).
Manufacturer field (after placing the check mark, user can see the producer).
Report access:
-Inventory dynamics (after placing the check mark, user will be able to see inventory dynamics report in StockM). If you want to manage, it is necessary to have visibility of SKU, suppliers and users lists.
-Buffer status (after placing the check mark, user will be able to see buffer dynamics report in StockM). If you want to manage, it is necessary to have visibility of SKU, suppliers and users lists.
-Service status (DTA) (after placing the check mark, user will be able to see service status (DTA) report in StockM). If you want to manage, it is necessary to have visibility of SKU, suppliers and users lists.
Other access
-Split mark (full access – get all rights to manage; view – see only the information).
-Dimensions (full access – get all rights to manage; view – see only the information).
-Reasons (full access – get all rights to manage; view – see only the information). It is asked to show the reason, when you change ordered quantity manually or change the buffers.
-Currencies (full access – get all rights to manage; view – see only the information).
-Period (full access – get all rights to manage; view – only see this menu, information; no access – have no permission to see the menu). Periods are used for seasonal change of buffers.
-Promo (full access – get all rights to manage; view – see only the information).
Warning access:
-Warnings (full access – get all rights to manage; view – only see this menu, information; no access – have no permission to see the menu).
3. Users:

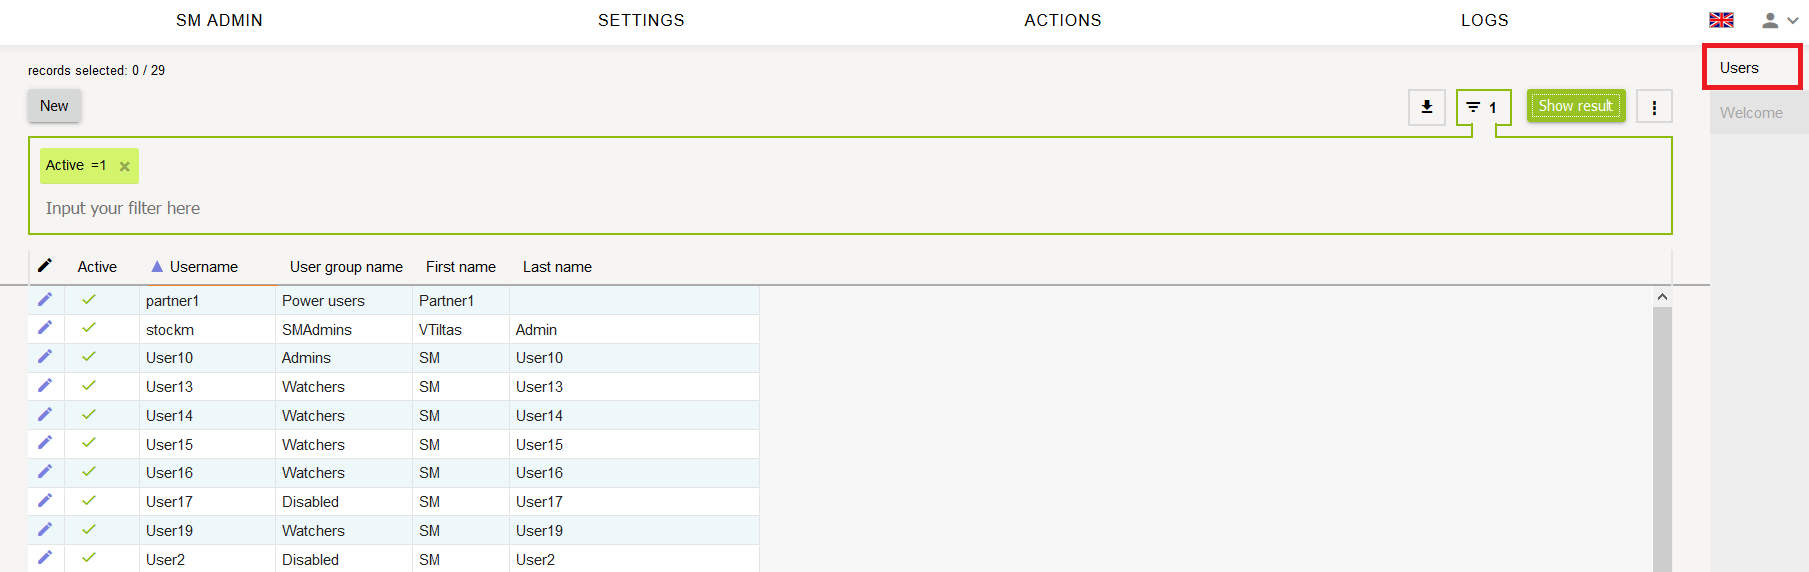
In the window you can see employees of the company, which work with the StockM assortment management system. If you want to create a new user, click the button “New” in the left corner. Fill in all the information in the user card:
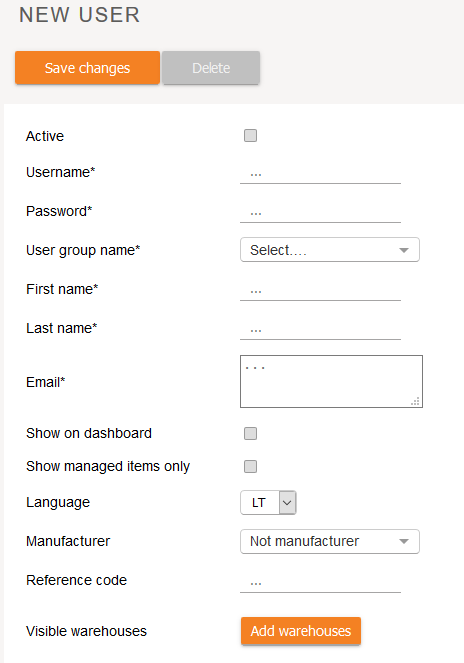
-Active: check mark of user activity
-Username: enter the name, by which user will log in to StockM assortment management system.
-Password: enter the password, by which user will log in to StockM assortment management system.
-User group name: select user group from the drop-down list, for which you want to assign the user.
Recommendation for the users:
- When the user no longer works with the program, he needs to be deactivated and all his items will be assigned to an Unassigned Manager or to an indicated responsible manager instead of Unassigned.
- If you want user to be disconnected temporarily, but the items must remain assigned to him, then assign the user group Disabled.
-First name: enter the name of user.
-Last name: enter the last name of user.
-E-mail: enter the e-mail of user, where will be send the copy of placed order (via StockM system) and specified e-mail will be used as backward contact from the direct order receiver.
-Show on dashboard: after placing the check mark, you can select users (name, surname) in the first StockM window (tasks and indicators of the selected user will be showed).
- Show managed items only - if the check mark is placed, the user will only see his / her items (which he / she manages).
- The user will see the items assigned to him in the StockM windows: Inventory, Buffers to increase, Buffers to decrease, Incompleted SKU data, Questionable buffers, Supplier SKU info.
- In the Inventory window, when creating new SKU cards, user will be able to select only himself as the assigned manager.
- This restriction will not work in the windows Promotions, Periods, Orders, SKU groups – the user will see the items of all managers because in these windows information can be entered for the items of more than just one manager (for example, an order to the same supplier can contain items belonging to several managers).
-Language: letters about user tasks will be sent in specified language.
-Manufacturer: if producer of goods wants to log in into StockM, so it is created user and assigned producer for him. Such user will be able to see only his goods in StockM.
-Reference code: manager‘s code which is responsible for the product/item (it is used when manager‘s code is renewed from the customer‘s accounting system for each item).
-Visible warehouses: specified warehouses, which user must see in the StockM (if the information was specified in the warehouse‘s card, you will see it here).
Click the button „Save“, after entering all the information.
Click the button „Delete“, after removing the user.
If you want to change/edit user‘s information, click ..... in the users list and click „Save“ after changing the required information.
1. Warehouses:
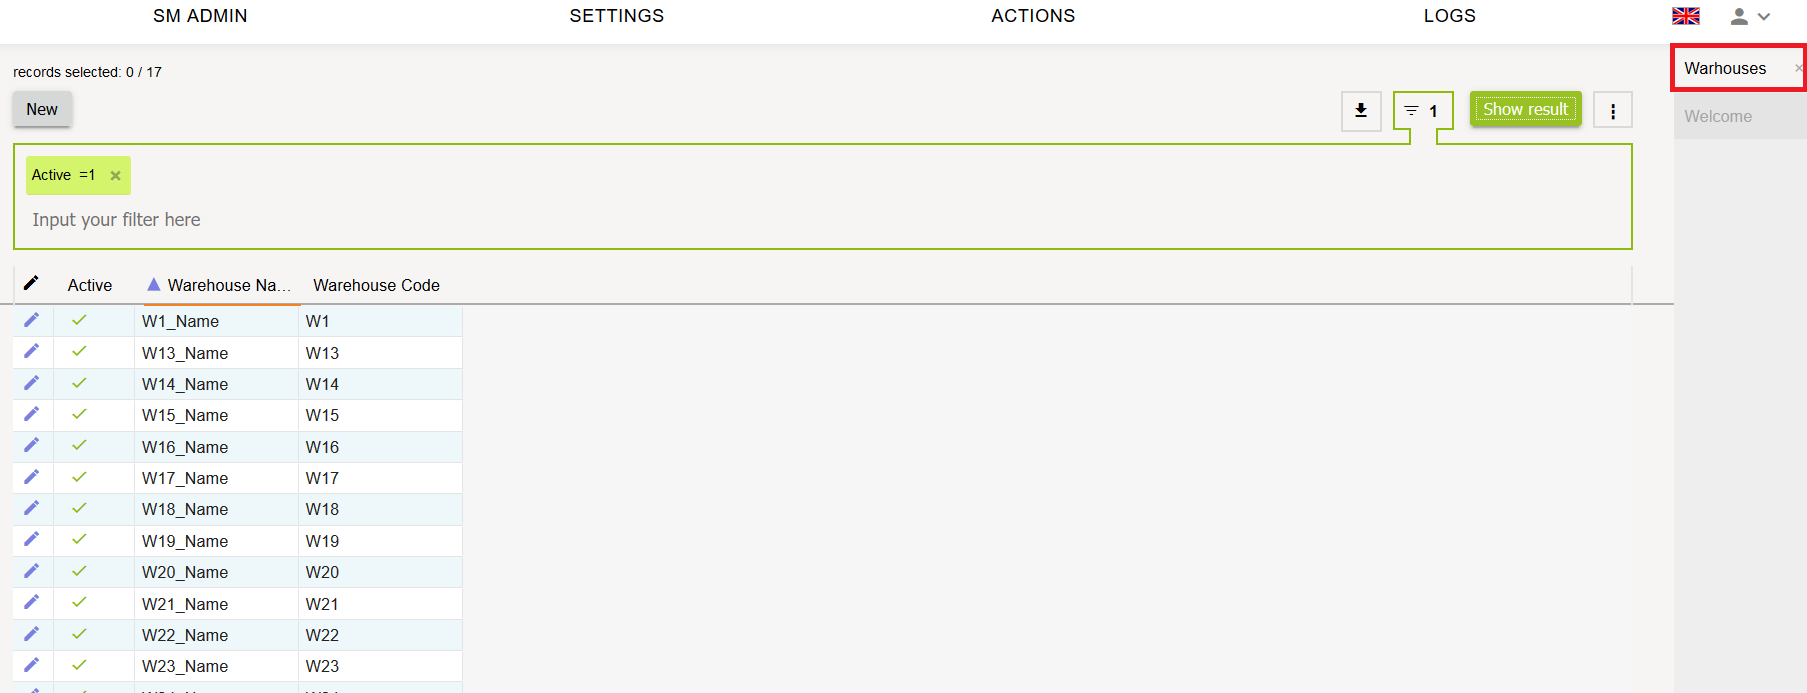
It is necessary to create and describe the warehouse before starting to manage the assortiment and get the data regularly from the customer‘s accounting system.
Click the button „New“ in the left corner in the window that opens. Fill in the necessary information in the warehouse card:
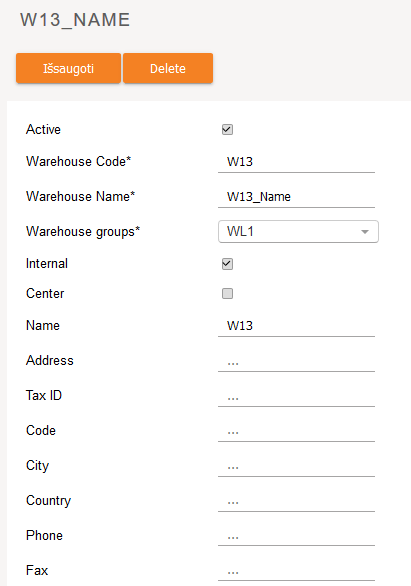
- Active: warehouse activity check mark. The data is updated only for active warehouse from customer‘s accounting program, also you will see only active warehouse in StockM.
- Warehouse Code: enter the code according which data will be updated from customer‘s accounting program.
- Warehouse Name: enter the name of the warehouse.
- Warehouse groups: select from the list, which group of the warehouses this warehouse belongs to, according which you will manage the assortment of goods (see. Assortment management rules). The group shows warehouse size, specific, uniquiness and etc. (inside order of customer‘s company). If the group of the warehouses is not used, then the level „All“ is assigned for all warehouses.
- Internal: place the check mark near the warehouse, which is the inner warehouse of the company (managed warehouse, belongs to company).
- Center: place the check mark near the warehouse, which is the central warehouse of the company, i.e. from which further chain warehouses are filled in (when you assign the mark OUT for an item – the system transfers such items state to DTO automatically in the central warehouse, i.e. an item is not ordered anymore from the external supplier, see. Assortment management rules).
- Name: enter the name of the warehouse which is created as new (you will see this information in the standard form of order).
- Address: enter the name of the warehouse which is created as new (you will see this information in the standard form of order).
- Tax ID“ (Tax code): VAT payer code (you will see this information in the standard form of order).
- Code: company code (you will see this information in the standard form of order).
- City: city, where is the warehouse (you will see this information in the standard form of order).
- Country: country, where is the warehouse (you will see this information in the standard form of order).
- Phone: contact phone number of the warehouse (you will see this information in the standard form of order).
- Fax: fax number of the warehouse (you will see this information in the standard form of order).
- Email: contact e-mail of the warehouse (you will see this information in the standard form of order).
- Email cc list“: receivers, which shall receive the orders from this warehouse.
- Delivery country: additional parameter of the warehouse, which marks in which country the warehouse is.
- Delivery code: additional parameter of the warehouse, which most often is the same as warehouse code.
- Extra (additional field): additional information, which must be visible in the standard form of order near the customer section.
- Format (Warehouse order credentials): write, what kind of information must be visible in the standard form of order near the CUSTOMER field.
- User visibility: specified users, which must see this warehouse in StockM (if the information was written in the user‘s card, you will see it here already).
Click the button „Save“ after entering all the information.
Click the button „Delete“ (Remove) if you want to remove the warehouse.
Click  if you want to change/edit warehouse information and click „Save“ after changing the required information.
4. Warehouse groups":
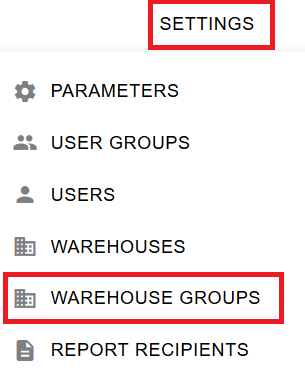

Warehouse group – group, according which you will manage assortment of goods (see, Assortment management rules). The group tells about the size, specific, uniquiness and etc (internal order of customer‘s company).
New group is described by clicking the button „New“. In the window that opens, enter the name of the group, click the button „Create“.
5. Report recipients:
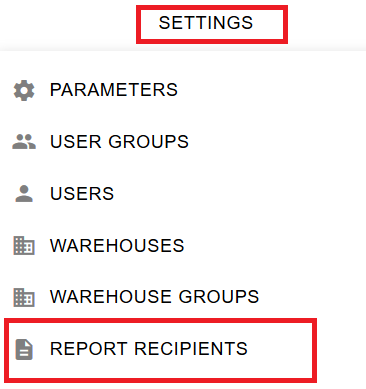
Specified the list of all available reports, which can be generated in StockM. E-mail addresses of users, which must get the reports, are uploaded. Receivers of reports are assigned step by step, according to steps of project implementation.
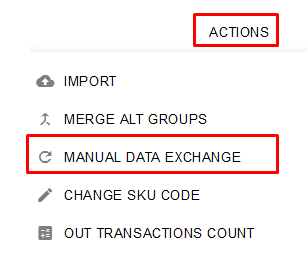
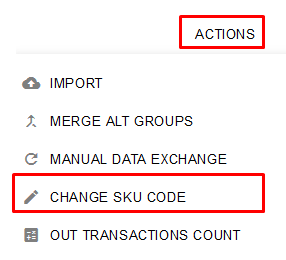
Actions
1. „Import“ – data import into StockM:
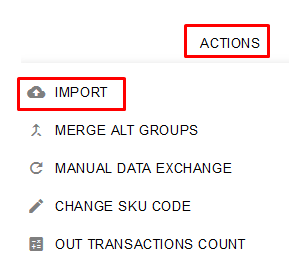
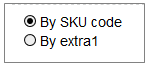
It is possible to import information about goods into StockM in administration module (StockM). Information can be imported according to:
-SKU code or
-Extra1 field (if the customer doesn‘t use SKU code for recognizing the goods and into Extra1 field from the accounting program is given other customer‘s used code).
There are two types of information of StockM item (SKU):
1) Import global SKU data – information for an item, which is common in the company (items „in head“) and doesn‘t change through warehouses, for example: extra fields, weight, volume and etc.
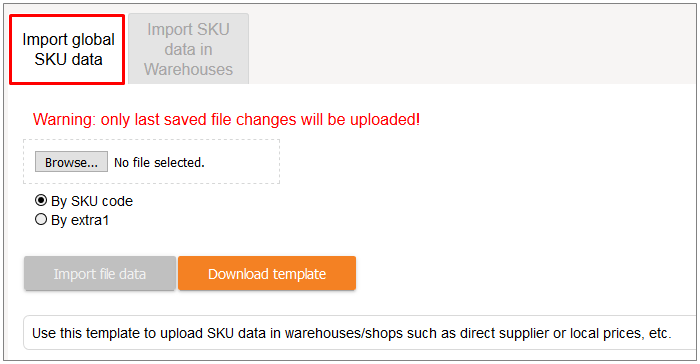
When you click „Download template“, the template is sent in excel format, which must be filled in:

When you Import global SKU data, the required field is: SKU code/Extra1.
- If the field is textual, for example, Extra fields, then must be entered text, which will be imported.
- If you need to remove the text, then you must put the „gap“ symbol into the field.
- If the field is numeric, then you must write the specific number.
- If you need to put/take out TOP/NON/OUT marks, then you must write the value 1(put) ir 0 (take out), accordingly.
Completed template must be saved and closed. You should select the completed file (Browse) in the window Import global SKU data and click „Import file data“. If there will be any mistakes in the completed file, the system will show it. All mistakes must be corrected.
1) Import SKU data in Warehouses – this information can be different through the warehouses, for example: MOQ, Supplier code and etc.
You can choose to import the information:
- For the specified warehouses (By warehouse code);
- For the specified warehouses levels, i.e. when the warehouses are grouped and you need to import the same information for all warehouses, which belong to the same group (By Warehouse group)
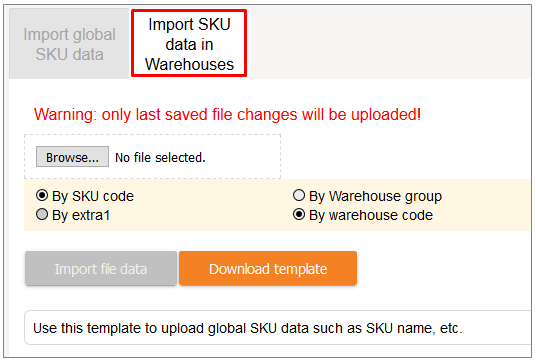
When you click „Download template“, you will get the template in excel format, which must be filled in:

When you upload Import SKU data in Warehouses, SKU code/Extra1 code and Warehouse code/Warehouse level are the required fields.
- if the field is textual, for example: Wextra fields, supplier SKU name, then the text, which will be uploaded, must be entered.
- If you need to remove the text, then you must put the „gap“ symbol into the field.
- If the field is numeric, then you must write the specific number.
- if you need ti define the status, then you must enter the DTA, DTO, NM, NA, accordingly.
- If you need to put/take out TOP/NON/OUT marks, then you must write the value 1(put) ir 0 (take out), accordingly.
- the state doesn‘t change for the alternative goods.
The completed template must be saved and closed. In the window Import SKU data in Warehouses, select the completed file (Browse) and click "Import file data".
Information will be loaded from those rows that do not contain errors, and a list of errors will be shown to the user (errors can be exported to excel as before).
Once the errors are corrected, the data will have to be uploaded for specified rows once again by entering information into a new / separate L11 table template.
2. "Merge ALT groups" - mass combining into groups of alternative items (ALT).
2. "Manual data exchange"


In the window there is a draft of the table for mass combining of the items into ALT groups.
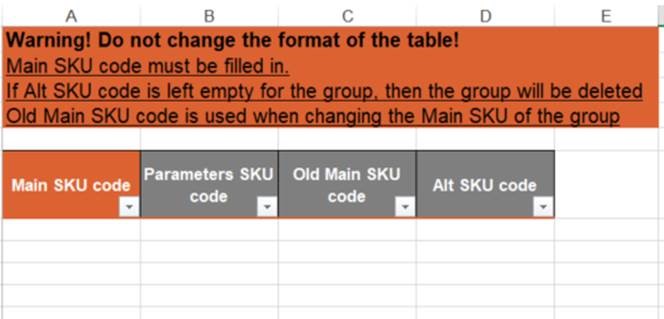
- Main SKU code: SKU code of the main item in the group.
- Parameters SKU code: SKU code of the item, which parameters will be assigned to the main SKU.
- Old Main SKU code: if the existing group of items is changed, indicate the existing (old) code of the main SKU in the group. The Main SKU code field must contain the new main SKU code.
If a new group is being combined, do not specify anything in this field.
- Alt SKU code: SKU code of alternative item
Note: If there is more than one ALT item code for the same main SKU code, they must be listed on separate rows, repeating the main SKU code on each row.
The completed table needs to be imported into StockM.
3. "Manual data exchange"
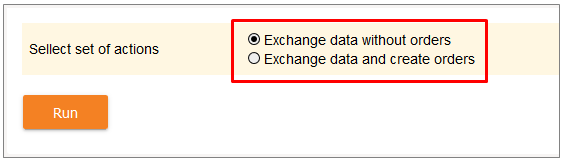
It is possible to run repeated data exchange in StockM administration module, if the data were not updated in time or were updated unsuccessfully.
IMPORTANT: data files must be formed from the accounting program, before completing that function, and sent to FTP or other agreed place.
-If you need to update the data, however it is not necessary to create orders according to set orders formation graph, then you have to mark „Exchange data without orders“ and click „Run“.
-If you need to update the data and create orders automatically according to set orders formation graph, then you have to mark „Exchange data and create orders“ and click „Run“. Data exchange will be started to execute and after it orders will be formed.
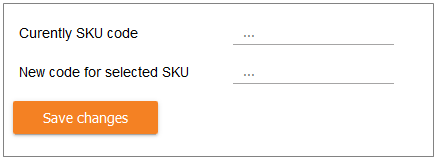
4. „Change SKU code:
2. „Change SKU code:

You can change the SKU code of item in the SKU administration module (Change SKU code), i.e. when the new code is entered in accounting system instead of previous code.
IMPORTANT: Changes must be done the same day in the accounting program and in StockM.
If the code was changed earlier in the accounting program, then one more additional code will appear in StockM (will be old code and new code). In such case items/goods must be connected as alternatives (see, Combining alternative items)
1. Enter the current SKU code into the field „Currently SKU code“. Enter the code into field „New code for selected SKU“, which you want to change.
Save entered values.
Logs (Log reports)
It is possible to check users log in and information about made changes in StockM administration module.
1. „System access log“
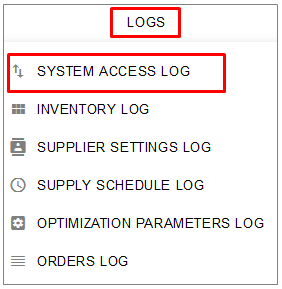
You will see information about user‘s log in into StockM or date and time of StockM administration module.
You can choose the filtration parameters in the window that opens:
- desired date/period. This parameter is necessary;
- user, which you are looking for;
- select only the date if you want to review only users logins;
- click „Show results“ after completing the settings;
- you can analyze filtered data in the window or export data into Excel.

User was logged in successfully, in there is a value „1“ in the column.
2. „Inventory log“ – report of goods parameters change
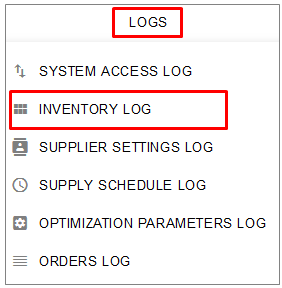
You will see changes, which were done by users.
You can show filtering data in the window that opens:
- desired date/period. This parameter is necessary;
- user, if you know it;
- item (SKU code or SKU name);
- warehouse, where you want to see changes (Warehouse code or warehouse name);
- click „Show results“ after completing the settings;
- you can analyze filtered data in the window or export data into Excel.
Part of changes do the StockM system automatically, then you can see in the User column for example: Period set – changes are made automatically by executing periodical actions.
In the column „Field“ you see what value has been changed, for example: Buffer value – the size of buffer.
In the columns „Before change“ and „After change“ you see what kind of information was before and after the change.
3. „Supplier settings log“ – report of supplier‘s parameters change.
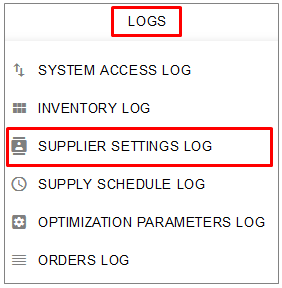
You will see what parameters of supplier‘s were changed.
You can show filtration data in the window that opens:
- desired date/period. This filtration parameter is necessary;
- user, if you know it;
- supplier (Supplier code or supplier name);
- click „Show results“ after completing the settings;
- you can analyze filtered data in the window or export data into Excel.

In the column „Field“ you can see what value was changed, for example: e-mail.
In the columns „Before change“ and „After change“ you see what kind of information was before and after change.
4. „Supplier schedule log“ – report of supplier‘s orders graphs change.
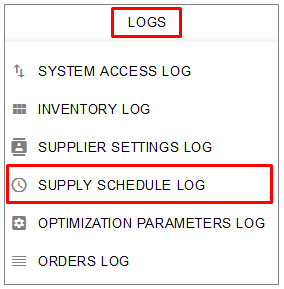
You will see changes, which were made in orders graphs.
You can show filtration data in the window that opens:
- desired date/period. This filtration parameter is necessary;
- user, if you know it;
- supplier (Supplier code or supplier name);
- warehouse (Warehouse code or warehouse name);
- click „Show results“ after completing the settings;
- you can analyze filtered data in the window or export data into Excel.

In the column „Field“ you see what value was changed, for example: Active – activity of graph.
In the columns „Before change“ and „After change“ you see what kind of information was before and after change.
5. „Optimization parameters log“ – report of optimization parameters change.
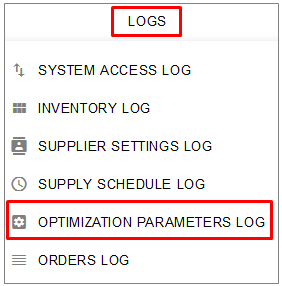
You will changes, which were made in optimization parameters in supplier‘s cards.
You can show filtration data in the window that opens:
- desired date/period. This filtration parameter is necessary;
- user, if you know it;
- supplier (Supplier code or supplier name);
- warehouse (Warehouse code or warehouse name);
- click „Show results“ after completing the settings;
- you can analyze filtered data in the window or export data into Excel.
In the column „Field“ you see what value was changed, for example: OptimaSize – Purpose.
In the columns „Before change“ and „After change“ you see what kind of information was before and after change.
6. „Orders log“ – report of actions with orders fixation.
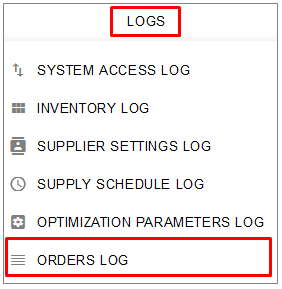
You will see actions, which were made with orders.
You can show filtration data in the window that opens:
- desired date/period. This filtration parameter is necessary;
- user, if you know it;
- item (SKU code or SKU name);
- supplier (Supplier code or supplier name);
- warehouse (Warehouse code or warehouse name);
- Order number, if you know it.
- Etc.
- click „Show results“ after completing the settings;
you can analyze filtered data in the window or export data into Excel.

In the column „Operation“ you see what action was made, for example: init – created; edit – edited; send.
In the column „Quantity“ you see the quantity, which was set.